THE PRIME-FOCUS METHOD
ASTROPHOTOGRAPHY
- Last Updated On:
THE PRIME-FOCUS METHOD
The prime focus method is a little bit harder than the others. It involves using your telescope as a very long camera lens. For this method you will need:
- A telescope!
- An DSLR camera with removable lens– either film or digital.
- A camera to telescope adapter. This is any sort of device that gets from the eyepiece holder (or sometimes a special photo-cell at the back of the telescope) to a standard thread which all T-rings fit (I’ll explain T-rings in a moment). A typical such adapter would have a barrel at the bottom like an eyepiece and a wider part at the top with a screw thread. These cost from $15-$30. An example.
- A T-ring. This is is a metal ring with a standard screw thread on the inside (a thread that fits all camera-telescope adapters) and a connection that is specific to your camera on the outside. This can either be a screw-thread (Pentax) or bayonet (Minolta, most other manufacturers). T-rings are usually individual to each camera manufacturer, and they typically cost about $10. An example (this one’s for a Nikon)
- Helpful but not necessary is a cable release. If you don’t have one you can use the timer on the DSLR, so you don’t have to touch the camera as the shutter opens.
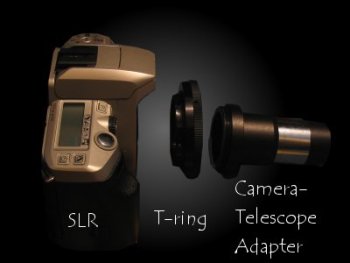
An SLR is needed because the telescope is now the camera’s lens, hence to see through the telescope the camera viewfinder needs to be actually looking through the lens (an SLR).
If you already have a digital SLR that’s great, it’ll be easier for you to pick up the technique as you can see the pictures straight away, however digital cameras do struggle with long exposures (battery life and heat on the sensor causing noise on the image) you’d be better off getting an old mechanical SLR because you won’t run down the batteries and you’ll be able to do the other methods I’ve described as well. Have a look at my camera guide for more about buying a camera for astrophotography.
So, you’ve got your camera, a T-ring, a camera to telescope adapter and a telescope. Remove the lens of the camera, and put the T-ring in it’s place. Screw the camera-telescope adapter into the T-ring, and then place the barrel in the eyepiece holder. If you look throught the camera’s viewfinder, you should be looking through the telescope (you might need to focus it a bit, usually at prime-focus the focus point is at an extreme of the telescope’s focus). You should be ready to go!
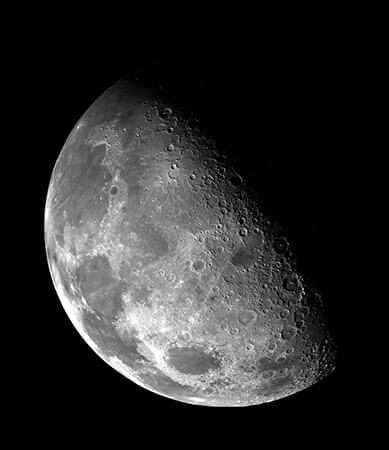
What can you photograph with this method? Unless you have a very large telescope, I’d stick to the moon and possibly the planets if your telescope has a long enough focal length.
This is because they are bright and therefore much easier to photograph than dim deep-sky objects. The problem with prime focus is that you can’t really do any guiding, you’ve got nothing to look through during the exposure (you can’t see through the camera viewfinder while the shutter is open).
There is a device called an off-axis guider, which splits some of the light off during the exposure so you can see it. With one of these, in theory you’re exposure time is limited only by your skill at guiding and light pollution. I am considering getting one and I’ll update this article when I can recommend them.
Without, however, with this method you’re limited to short (a few seconds) exposures. This is enough to get some reasonable shots of the moon and possibly planets.
The most difficult thing with prime-focus is getting the exposure right. You’re camera’s light-meter probably won’t work, as it will not compensate for a dark sky (it wasn’t designed to work under these conditions). The best thing to do is to take lots on different exposure settings, write down the settings for each shot, and compare them to the pictures when they come back from the lab (this is where digital owners have the one-up- they can see what works straight away). Expect to waste one or two rolls of film in acquiring the technique.
The magnification you get is actually surprisingly low. It is roughly your telescope’s focal length divided by 50. You can increase the magnification by using a barlow lens, most camera-telescope adapters have a screw thread in their barrel so you can take the lens out of your barlow and put that in to double the magnification (remember, though, you trade off brightness and sharpness for it).
With this method, be aware that sometimes the corners are blackened on the film, due to the telescope lens being round and the film being square, this is known as vignetting. In most cases it won’t matter however, as the background is black anyway!
LINKS
- Images
Some prime-focus pictures. Also send in your prime-focus pictures to the gallery. - Best Cameras for Astrophotography
A comprehensive guide about the different cameras available in the market. - Best Telescope For Astrophotgraphy
A buying guide about the best telescopes available for astrophotography.
After doing a bit of prime-focus photography, you’ll find that it gives a surprisingly small image, not very good for thing like the planets. There is a another method which gives you a larger image scale but is very hard! Watch this space for the ‘eyepiece projection’ article coming soon!
SUBSCRIBE TO OUR WEEKLY NEWSLETTER