TELESCOPES
EQUIPMENT
- Last Updated On:
TELESCOPE BUYING GUIDE
So you’ve made the decision to buy a telescope, a decision that could be the beginning of a rewarding and enjoyable hobby. When I was buying my first telescope, I was a bit bewildered by the variety of different models on offer. It is important to do your research, as there is a lot of rubbish out there to fool you.
To begin with, forget the toy-like sort of thing you see in catalogues and department stores that promise some ridiculous amount of magnification; “660x Astronomical Telescope” and the like. This plays on a common misconception:
A WORD ABOUT MAGNIFICATION
Most people think that in anything optical, that magnification is everything. However, magnification is not what you want to be able to enjoy astronomy, as most observing (even for people with enormous telescopes that cost thousands of pounds), is done at under 50x magnification. The telescope’s primary functions are to increase the brightness of, as well as magnify celestial objects. It has a larger lens than the human eye so has more light-gathering power. Important to grasp is that a smaller, brighter, sharper image is better than a larger, dimmer, fuzzier image.
When you increase magnification, you always trade off brightness and sharpness for it. If you increase the magnification by a factor of two, resolution and brightness go down by a factor of four. Of course, having lots of magnification is a good thing, especially for the moon and planets, but it’s only good if its under the maximum supported by your telescope.
So when you see a telescope advertised according to magnification power, it’s a fairly good indication that its not really worth getting, as it’s being aimed at the general public who see it claiming to offer 660x magnification and buy it on a whim.
The truth is, these people get disappointed an just end up putting it in the loft, because it’s rubbish. The thing is, is that the advertised magnification is invariably theoretical.
The maximum practical magnification, that is the highest magnification that still gives a reasonable image, is five or six times less. You can calculate it by multiplying the primary lens or mirror diameter in millimetres by two, although it can be less than this depending on the quality of the optics. So our telescope mentioned at the outset, in order to offer 660x magnification would need to be 33 centimetres (12 inches!) in diameter, and have a very stable mount. (In case you’re wondering it was actually 6cm in diameter and was stabilised with a thin metal rod and a nut.)
SO WHAT DO I WANT?
The telescope you want has two things- good optics and a stable mount. And if you’re like me and most people, you’re on a budget. There are two general types of telescope within the amateur budget: reflectors and refractors. (there are telescopes that use a combination of the two, but these are typically out of the budget range of most beginners).
REFLECTOR
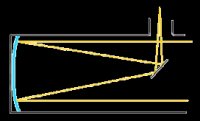
Reflectors have one open end and a curved mirror at the back. Light is reflected and focused by this mirror onto a secondary mirror, which reflects it up into the eyepiece.
Refractors are generally cheaper per inch of aperture and are in general better for the beginner on a budget, but aren’t very good for ground observing, as the image is upside-down.
REFRACTOR
A refractor has a lens at the front which refracts light from the stars and focuses it at the eyepiece (often by means of a 45° mirror-in which case the image is reversed left-to-right). The image is the right way up meaning that these are better suited if you want to do ground observing as well. If the optics are good, then refractors can form better images, but are usually more expensive per inch of aperture.
OPTICS
There are four specifications you might see on a telescope relating to its optics:
- Objective diameter
- Focal length
- Focal ratio
- Resolving power
You’ve probably gathered by now that the most important of these is objective diameter, or aperture. The more aperture you have, the brighter and sharper your images will be, and hence the more magnification you can use. It determines the level of detail that you can see (see resolving power). Generally the larger the telescope the more expensive it is.
So the bigger the better? Yes, but don’t overlook portability- very few of us are going to be able to have our telescopes set up permanently (as observing is ALWAYS best outside) so buying a smaller scope will mean you’re more motivated to go out more often. I’ve experienced this myself when I was lent an 8″ telescope on a heavy equatorial mount- a very good telescope but it was such an effort to haul it outside I took it out very rarely- whereas my small ETX-70 I can take out very easily whenever I feel like it.
If you buy too large a telescope before you really gain an appreciation of the hobby likely you won’t be motivated to make the effort to take it out. Look for the largest aperture you can reasonably afford and is still quite portable.
Focal length refers to the distance from the lens or mirror that the light is focused. The focal ratio (also photographic speed) is the focal length divided by the aperture diameter, given an f/ number, e.g., f/5.0. ‘Slow’ (high focal ratios and f numbers) telescopes lend themselves to higher magnification as you can use wider eyepieces, which makes viewing much easier (especially for those who wear glasses). On the other hand fast (low f numbers) telescopes offer a wider field of view:
High focal ratio offers narrow view
Low focal ratio offers wide view.
Resolving power is not always given as it increases proportionally with aperture so you don’t really need to know it. It refers to the image sharpness, or resolution. It is measured in arcseconds (one arcsecond is 1/3600 of a degree) and is the angular size of the smallest detail the lens can resolve, so smaller numbers are better.
For instance, a telescope with a resolving power of 1.6 arcseconds (such as my small ETX-70) can resolve details the size of a penny a mile away, or about 2 miles wide on the moon.
Something that cant be given in a specification but is also important is optical quality. This is difficult to test in a shop but if you get a chance to use it on a clear night look at a starry region on low-power- does it appear sharp and crisp or does it have lots of off-axis colour (blue on one edge, red on the other)?
Objects on the edge of the field of view will appear less sharp on any telescope, but is this happens less than half-way from the centre it indicates poor optics. On higher magnifications is it possible to get a sharp focus, or do you get multiple (ghost) images, which again indicates poor optics?
If, like me you’re buying your telescope off the internet, (be careful- know exactly what you’re looking for!) buy from companies who are renowned for optical quality, such as Meade or Celestron; usually you can trust these companies to provide superior optics. Companies such as Tasco usually offer lower-end products with inferior optics.
MOUNT
The other thing your telescope needs is a strong, sturdy mount. The best optical telescope in the world would be useless without a good mount, as the the slightest vibration on a flimsy mount makes the image unviewable. Cheaper department-store telescopes have terrible mounts, making it very frustrating because you can’t keep the picture still. There are two types of mount; Equatorial and Alt-Azimuth.
ALT-AZIMUTH
This is the ordinary mount that seems most logical to most people having a simple left-and-right axis (Azimuth) and an up-and-down axis (Alt). Although often found on cheaper scopes, these are perfectly fine as long as they’re sturdily made and there is some way of making fine adjustments to it’s position, such as a motor or knob to turn. In addition it is very easy to use.
EQUATORIAL
The equatorial mount at first may seem illogical to a beginner, but does have great advantages over the alt-az mount. Instead of moving left/right and up/down relative to the horizon, it moves up/down left/right relative to the celestial equator.
Because it is now aligned with the Earth’s axis, only one axis needs to be moved to keep an object centred as the Earth turns (you’ll be surprised how quickly they do move on higher magnification). These mounts are much better for piggyback photography, as objects are easily tracked. It also means tracking systems are much simpler and more accurate for your money, all that is necessary is a motor that turns once a day rather that a computer. Having said all this the equatorial mount has it’s disadvantages.
They are usually very heavy (they will be if they’re sturdy) because they need a counter-weight, and this will make it more difficult to take out (see the objective section above). They do take a while to get the hang of as well, having to move two knobs to move straight up, and you have to spend a minute or two aligning it if you want to use it properly. In addition they’re usually more expensive. If you do get one make sure it’s very sturdy and has some sort of counterweight system to balance the weight of the telescope, and some way to move the telescope very finely so that you can track easily and smoothly.
Whichever you go for, look through the telescope on a higher magnification and give it a slight nudge. Does the image move about uncontrollably for quite a few seconds? This indicates an inferior mount, and will get very frustrating if you buy it. Can you move it very slightly easily? If you can’t you’ll probably regret buying it, again being very frustrating when trying to centre an object.
BINOCULARS
Binoculars can be often overlooked for star-gazing… granted they have lower magnification, but sometimes this can be an advantage – it is easier to find objects with them, you get a wider view and although usually not as powerful as a telescope they still have a lot more more light-gathering power than your eyes, so you can still see dimmer objects.
In fact with the naked eye on a clear night you can see about 3,000 stars – with a modest pair of binoculars you can see about 100,000! They are also small and portable, so you’re more likely to use them for casual observing, so can be a good as an introduction to astronomy. The same principle applies if you’re buying binoculars for astronomy, a larger aperture means more light-gathering power, and therefore higher magnification is available, and objects appear brighter.
OTHER GADGETS AND GIZMOS
You may have seen these computer-controlled telescopes available now, and like me you probably like the idea of just pressing what you want to see and being take there. I bought a Meade ETX-70 which has a go-to facility. These telescopes have many advantages- they can track objects after a brief alignment even on an alt-az mount, and can take you to objects (this does help when you’re starting out), and also tell you handy information like sunrise, sunset, moon phases etc.
This is all very helpful but a go-to telescope is no substitute for knowledge of the sky. They are not perfect, so you need to know what you’re looking for (and what you’re looking at) and it takes away a bit of the fun and satisfaction in finding it yourself.
Depending on your own personal preference (whether you like working things out or just want the convenience of a go-to telescope) it may be better to by a non-computer controlled telescope and get a larger aperture telescope, better optical quality telescope for the same money, which will probably serve you better in the long run as you grow out of dependence on the computer.
LINKS
Please note these are my personal opinions based on my limited experience and the information I have gathered on the subject- please read some other articles as well before you buy your telescope. Here are some links to other helpful articles (some of which helped me when I was buying my telescope).
- Best Home Telescopes for Viewing Planets and Galaxies
A buying guide based on recommendations for Home Telescopes. - How Much Does a Good Telescope Cost?
A guide explaining why different telescope will be good for different uses and users. - Best Telescope for Beginners
The most in-depth guide for aspiring Astronomers that want to get their first telescope. - Buying Guide for the Best Telescopes for Astrophotography
A in-depth buying guide to understand what makes a good telescope for astroimaging. - Best Computerized Telescopes
A buying guide based on computerized telescopes with GoTo Mounts. - Best Professional TelescopeA buying guide aimed at the seasoned Astronomers.
- Best Celestron Telescopes
A buying guide focused on the best products available from Celestron. - Dobsonian Telescopes Buying Guide
A practical buying guide focused on Dobsonian Telescopes. - Best Telescopes By Aperture Size
Detailed selection of the best telescopes for each aperture size. - Top Telescopes Under 1000 dollars
A buying guide focused on the best telescopes between $700-$1000. - Top Telescopes Under 500 dollars
A buying guide focused on the best telescopes between $300-$500. - Top Telescopes Under 300 dollars
A buying guide focused on the best telescopes between $200-$300. - Best DSLR and Mirrorless Cameras for Astrophotography
A Comprehensive guide with the different cameras available for Astrophotography. - Best Refracting Telescopes
In-depth buying about the best refractor telescopes in the market. - Celestron NexStar 8SE Review
In-depth review and buying guide of the NexStar 8SE.
If you have a telescope and think its great, or maybe not-so-great, please send in a review to let others know what it’s like. If you’re thinking of buying a telescope check out my reviews section and see if there’s one on the telescope you’ve got in mind.
SUBSCRIBE TO OUR WEEKLY NEWSLETTER