Best Telescopes for Beginners
THE ULTIMATE BUYING GUIDE FOR 2020
- Last Updated On:
Introduction
If you ask around trying to find the best telescopes for beginners, you might get hundreds of different suggestions for expensive telescopes without any explanation as to what they are used for or why they are good.
If this scenario sounds familiar, you’ve come to the right place, because we understand how frustrating it is. We would like to assist you in a more meaningful way, so we have composed this beginner-oriented article that is meant to walk you through the basics about sky exploration and telescopes.
This guide will cover the most important topics such as the different types of telescopes based on their construction, the different features of a great telescope and our suggestions for affordable beginner telescopes.
We know that you have a lot of questions and while it is impossible to cover every detail in a single article, we will try to provide you with all the basics that you need to get into telescopes.
So, let’s get started!
Quick Rundown
THESE ARE OUR TOP PICKS SUMMARISED FOR:
25th April 2024

- 6-inch aperture with excellent light-gathering
- Fully automated GoTo mount with database of 40,000+

- Beautifully constructed 62mm refractor
- 4-element lens system

- Quick and easy no-tool setup
- German Equatorial mount with Setting circles

- A large aperture Classic Dobsonian reflector telescope
- The ultra-stable Dobsonian base

- Aperture: 102mm(4")
- Red dot viewfinder helps you point your scope

- 99% Reflective 2-inch Diagonal
- Explore Scientific 1 Year Warranty, Extendable to STAR Lifetime Warranty
What Qualities To Look For In A Great Beginner Telescope
Now that you understand the basics, we should take a look at some important qualities that impact a telescope’s performance. We will explain each of them in detail, so don’t be afraid of any unknown terms. We will also try to align them based on their importance.
APERTURE:
The aperture of a telescope is the diameter of its main light-collecting element. The main lens or the main mirror is called the objective. So, the aperture is simply the diameter of the objective.
The aperture is to a telescope what RAM is to a PC: there is never enough of it.
The bigger the aperture, the more expensive the telescope. A high aperture might impact the portability, but usually, the payoff is important and other features impact portability far more.
Table of Content
But most importantly, the bigger the aperture, the sharper and brighter the image you’re seeing. This is why aperture is the by far most important feature of any telescope. High magnification is impossible without sufficient aperture.
FOCAL LENGTH:
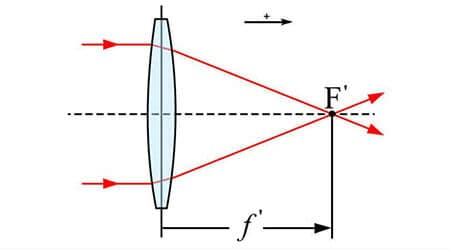
The focal length impacts the size and portability of the telescope, but also what you can see with the telescope. Generally, a bigger focal length allows for bigger magnification.
Shorter telescopes are not always easy to manufacture and can have fuzzier images.
A rule of thumb is that longer focal length telescopes (lower optical power) lead themselves especially well to higher magnification and a narrower angle of view. On the other hand, shorter focal length (higher optical power) is associated with lower magnification and a wider angle of view.
This means that high- power objects like the Moon, planets, or double stars and galaxies are easier to view with a longer focal length. For wide-shots of the Milky Way or clusters like the Pleiades, shorter tubes are a better choice.
FOCAL RATIO:
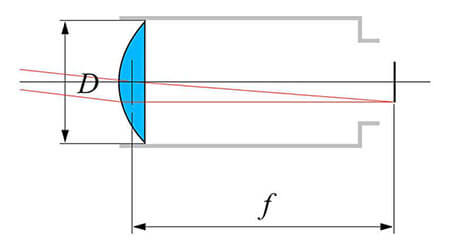
The focal ratio is the connection between focal length and aperture. The focal ratio is expressed in the form of an f-number and it gives you a quick overview of what your telescope is suitable for.
To calculate the f-number, you use a simple formula. Focal length divided by the aperture gives you the f-number.
Since the focal length is directly connected to the f-number, the same rule applies as above. An f/10 telescope is best for observing the moon and planets. On the other end of the spectrum, star clusters and galaxies are best viewed with a low f-number telescope.
Another element explained by the focal ratio is brightness, or in other words, it influences the brightness of extended objects like a nebula or galaxy.
Let’s put things into perspective. If the aperture stays the same and only the focal length changes, an f/5 telescope will display an image that is four times brighter than the one displayed by an f/10 telescope. However, the f/5 telescope will display an image that is two times smaller than the one displayed by an f/10 telescope.
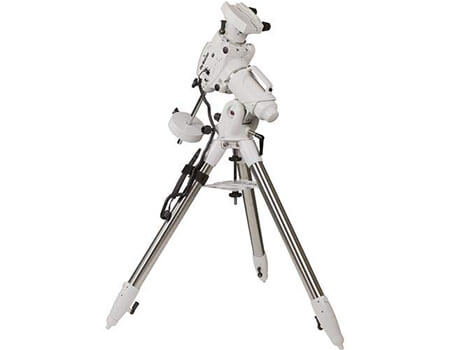
MOUNTS:
As we’ve described, there are two different types of mounts and both of them have advantages and disadvantages.
Be sure to carefully read the description of the telescope that you’re getting to make sure that your telescope comes with a mount.
If your telescope does not ship with one, you will have to do a little research to make sure that your telescope will fit the mount.
Usually, high-quality mounts are a bit expensive, but you really get a high- quality product. Make sure to choose a mount by a reputable and well-known company so that your telescope will stay stable and secure. A good mount will also make your life much easier.
Some mounts are computerized and others have special elements for adding a camera for astrophotography. We will explain all of the unique features of different mounts on our top 5 beginner telescopes list so that you can have an idea what to expect from different mounts.
EYEPIECES:
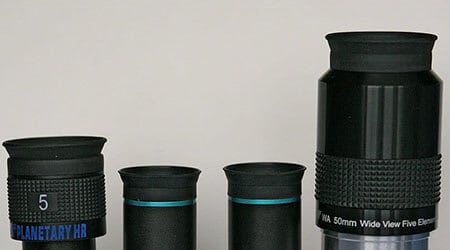
Eyepieces are very important because they impact magnification, sharpness and general image quality. Different telescopes ship with different eyepiece options. Some telescopes will be shipped with only one eyepiece, but most have multiple eyepieces.
Telescope eyepieces focus the light entering a telescope into the final image.
This means that they determine the magnification of what you are looking at, along with the telescope’s optics, of course. They also impact the field of view.
There are two standard sizes of telescope eyepieces. The first one is the 1.25″ diameter eyepiece size, which is used with almost any telescope. Almost every telescope ships with at least one 1.25″ eyepiece. The second standard size is the 2″ eyepiece size. These eyepieces are generally wide-field, low-power eyepieces. Keep in mind that this is the size of the diameter, not the focal length of the eyepiece.
Finally, Barlow lenses are something the Internet always talks about and you probably want to know what they are. Barlow lenses are inserted into the telescope’s focuser, right before the eyepiece. Depending on their design, these lenses double or triple the magnification. This means that, with the addition of a Barlow lens, you essentially cut the number of different eyepieces in half.
PORTABILITY:
Telescopes come in different sizes, shapes and weight categories. Think about whether you want a great telescope for your backyard that you will move to your house once you are finished or just a solid piece of gear that you can put in your car and take out of the city.
Aperture, focal length and weight all impact portability. Make sure to double check the dimensions and weight of your telescope and mount before you decide which telescope to buy. Also, computerized mounts will require an energy source, so you will need to consider that, as well.
EASE OF USE:
Considering that you are a beginner, ease of use is a very, very important factor. But even for pros, ease of use is something that makes a big difference between telescopes. You want to try to get a telescope that is easy to transport, setup and align.
Computerized telescopes can make finding certain objects easier and often come with audio files that make learning easier, but sometimes, they have old firmware or don’t want to align properly. Using non-computerized telescopes might be a good idea if you are not a huge fan of modern tech as sometimes you will get frustrated by the bugs and errors that come with modern gear. That being said, if you are tech- savvy, you should definitely consider computerized mounts as they make learning and exploring space much more fun and interactive.
FINAL THOUGHTS:
It is certainly not easy to keep an overview of all the different aspects of telescopes, but the good thing is that many of these elements are connected. Another good thing is that most of the time, companies try to make telescopes that are good in total. For example, it is very hard to find a telescope that has a massive aperture but comes with very bad eyepieces. You usually get what you pay for.
On the other hand, there are certainly telescopes out there that outperform their competition, even in the same price range. We have reviewed quite a lot of different models and made a list of telescopes that we think will suit every beginner very well. Let’s take a look at how we judged the telescopes before finally moving on to the actual list.
How We Picked And Tested the Telescopes:
With so many different models available, choosing the right telescope is not easy. To some people, the price is very important. To others, quality is the dominating factor. And for some people, portability is the biggest concern.
We have tried out many different models and compared them to each other. Our choices are based on the overall performance of the telescopes under very different conditions. Focal ratios that are in the middle of the spectrum (f/6 – f/8) will dominate our list as they are the middle ground solution for viewing all of the different objects in the sky. For beginners, this is very important, as you will be able to experience all the vast forms of beauty that space has to offer.
Our list will include 6 different telescopes and taking them as an example, we will try to explain and demonstrate the advantages and disadvantages of each model and type of telescope.
We have, of course, tried to keep the prices to a moderate degree. If you like a specific telescope, you can check out one of our other articles and find the category to which the model you like belongs. After that, you can compare that model to other models in a similar category and see what additional investments might get you. For users on a very tight budget, we also have a list of the most affordable telescopes available.
One of our biggest concerns was whether we could find affordable telescopes that had a high enough aperture to be used for different kinds of exploration and astrophotography. Luckily, there are a few models that stand out above the rest and have impressive features despite a fairly low price tag.
On the other hand, we found it counter-productive to simply look at the cheapest models available. Even if don’t continue using your telescope, we think that 4 or 5 very fun sessions are going to be way more fruitful than a single session with a terrible scope that will land in the trash the next morning. A good telescope can always be re-sold should you decide that you are not satisfied with it, while cheap models will most likely just clog your wardrobe.
Now that you know what to look out for, you will be able to understand why we chose each model that we put on our list. Take your time and read carefully through our list and try to look out for the telescope that will fulfil your needs and expectations!
Top 6: Best Telescopes for Beginners
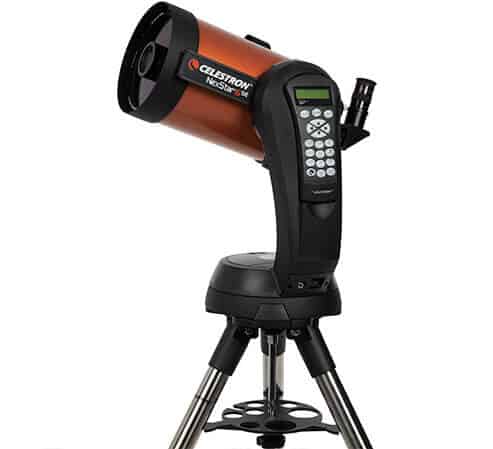
Best Telescope For Beginners With Goto Mount
APERTURE
150mm
FOCAL LENGTH
1500mm
MOTORIZED
Yes

Mount type
Alt-Azimuth
Our thoughts:
The NexStar 6 SE by Celestron comes with a GoTo computerized mount and amazing software for exploring the night sky. With a whole 6 inch of aperture, it delivers very sharp and bright images.
The so-called Orange Tube is an amazing series in general and the 6 SE is only surpassed by the 8 SE, but the price difference makes the 6 SE a better choice for beginners. The price is a little bit steep, but considering the amazing performance, it was impossible not to put this telescope right on top of our list.
Some of the unique and helpful features include the polar alignment feature, the possibility to upgrade the telescope with the Celestron Star Sense Auto Align and really good optics. The tracking is great, which makes this a great astrophotography telescope, even if you’re just using your mobile phone camera.
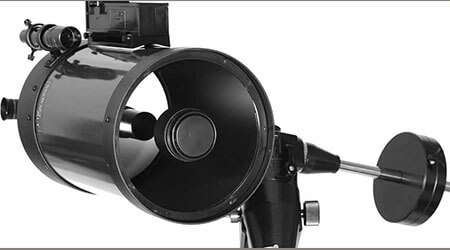
The Schmidt-Cassegrain design is a type of compound telescope designs, which means it uses both mirrors and lenses for superb results.
The only thing that was bugging us is the not-so-decent battery life.
That is generally a problem with computerized mounts and very few telescopes come with a really long-lasting battery, so this is only a little disadvantage.
All in all, this might the best telescope a beginner could get this year without spending massive amounts of money.
For more info on GoTo scopes we have a in-depth guide on computerized telescopes.
Specifications:
- Optical Design: Schmidt-Cassegrain
- Aperture: 150mm (5.91″)
- Focal Length: 1500mm (59″)
- Focal Ratio: f/10
- Focal Length of Eyepiece: 1 25mm (.98″)
- Ships with a great computerized mount
- Superb optics
- Easy to align and setup
- Somewhat heavy
- Battery life is not optimal
APERTURE
62mm
FOCAL LENGTH
520mm
MOTORIZED
No
Mount type
-
Our thoughts:
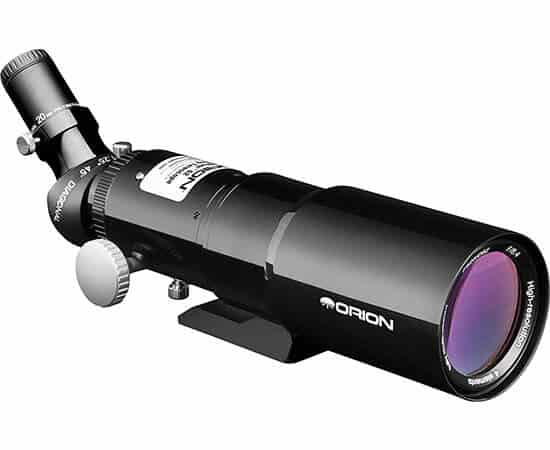
Among beginner refracting telescopes, the Orion 10149 reigns supreme. This telescope is part of the StarBlast series and comes with a 62mm aperture packed in an easy-to-carry form. Designed as a traveler’s telescope, you are meant to use it outside the city for the best results.
The focal ratio enables the StarBlast to be used for all sorts of sky exploration, but the telescope also excels at terrestrial exploration.
The 45-degree correct-image diagonal can be used for capturing amazing photographs. Finally, the two different eyepieces, namely the 20mm and the 4mm Plossl eyepieces, offer amazing views under different conditions, especially when viewing planets.
Another great tip is the observation of eclipses, but please do some research to make sure that your cope and your eyes don’t get damaged. For deep sky exploration, you will need a bit of a stronger scope, though, but it should get you through the basics.
To sum it up, the Orion StarBlast comes with a solid amount of aperture and amazing color-corrected viewing experience for a very low price.
The only downside is that the scope ships without a mount, which means that you will have to invest a little bit of cash into a mount, as well.
Our recommendation is the Paragon XHD tripod that will allow you to effortlessly look at all the objects in the sky.
If you are interested in this type of scope we have a specific buying guide for refractor telescopes.
Specifications:
- Optical Design: Refractor
- Aperture: 62mm
- Focal Length: 520mm
- Focal Ratio: f/8.4
- Coatings: Fully multi-coated
- Affordable traveler’s scope
- Fantastic image correction
- Multiple eyepieces
- Ships without a mount
- Doesn’t include a finderscope
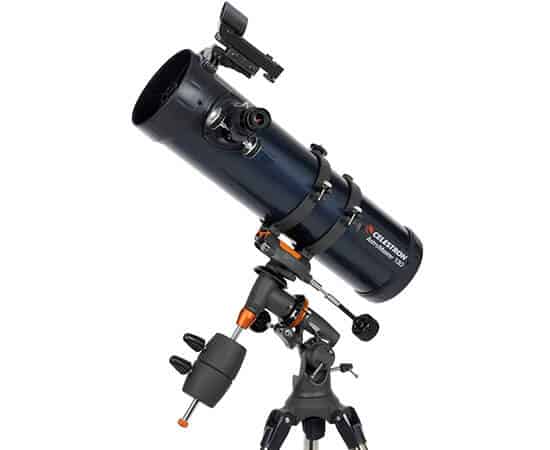
APERTURE
130mm
FOCAL LENGTH
650mm
MOTORIZED
No
Mount type
Equatorial
Our thoughts:
The Celestron 31045 is part of the AstroMaster series which includes great telescopes mounted on German equatorial mounts. With 130mm of aperture, the EQ is insanely powerful considering the very moderate price that includes a fantastic mount. You can also choose to get the same model with a basic smartphone adapter for some beginner astrophotography sessions, although your possibilities will be limited.
The telescope is really easy to use and requires very little setup. The mount is stable and viewing planets or nebulae will be a real delight. The design is very compact and comes with an image corrector and a Barlow. We recommend getting an additional kit of lenses, which will significantly enhance your viewing experience.
Considering the very low price of this scope, you should be able to save up a little more for a lens kit. The close-ups of the Moon will blow you away, but the scope would need just a bit more power for very effective exploration of DSOs. Still, it can manage to do that, though not quite as good as the more expensive competitors.
As for the downsides, the micro-movement twisters seem to be a nice addition at first, but actually, they are more frustrating than they are worth it. The equatorial mount is sadly not computerized, which would make this telescope amazing for astrophotography.
On the other hand, the manual design allows beginners to properly learn how to track objects in the sky. Because of this, we think that it is one of the best beginner telescopes in this price range.
The configuration is fantastic and you can never go wrong with Celestron products.
If you are unsure whether you should get a reflecting telescope, check out our comparison between reflector and refractor telescopes for more information.
Specifications:
- Optical Design: Newtonian Reflector
- Aperture: 130mm (5.11″)
- Focal Length: 650mm (25.6″)
- Focal Ratio: f/5
- Finderscope: Built-on StarPointer
- Superb aperture for the price
- Great equatorial mount
- Easy to use
- Not computerized
APERTURE
203mm
FOCAL LENGTH
1200mm
MOTORIZED
No
Mount type
Dobsonian
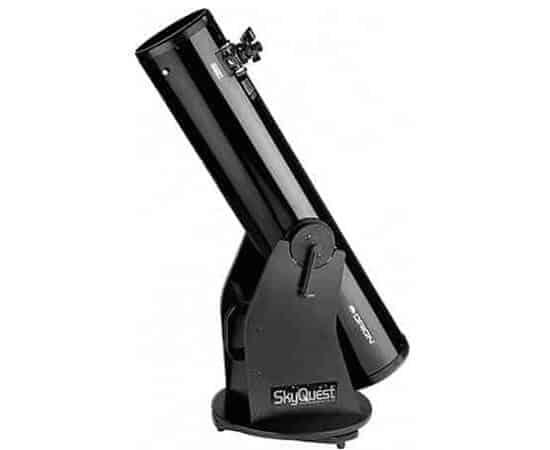
Our thoughts:
Dobsonian telescopes have a unique Alt-Az mount that allows them to be used with much ease even by total beginners. The Dobsonian design is optimized for observing faint, deep-sky objects. Those include nebulae and galaxies and require bigger telescopes with a higher aperture.
The Orion SkyQuest XT8 is a great Dobsonian for beginners who want to get into DSO. The 8-inch aperture is more than enough for beginners and will not just offer fantastic closeups of the moon and neighbouring planets, but also open up the deep sky for you.
The telescope’s Dobsonian mount is stable and easy to use even by younger generations, although it is too heavy for them to transport. Despite the weight, it is easy to transport in a car, so we recommend going to a mountain area with a clear night sky for best results.
The versatile design allows the telescope to be paired up with both 1.25″ and 2″ telescope eyepieces. The Orion Skyquest XT8 includes a 25mm Sirius Plossl eyepiece, a reflex sight, and a collimation cap. Using the Starry Night software, beginners can learn more about space and telescope in an easy and interactive way.
The downsides of a Dobsonian include the fact that it is not always friendly towards very tall people, so be prepared to bring a folding chair or something you can place the telescope on while watching stars.
Due to the low price, the mirrors are not of ideal quality. Despite the high aperture, the telescope does not exactly work as good as the more expensive counterparts, but for beginners, it is more than enough.
Wanna compare the Skyquest XT8 to other Dobs?
Here’s a nice article focused solely on Dobsonian telescopes!
You can also check our mid-tier telescope buying guide.
Specifications:
- Optical Design: Reflector
- Aperture: 203mm
- Focal Length: 1200mm
- Focal Ratio: f/5.9
- Optic Type: Parabolic
- Very stable and easy-to-use mount
- Very high aperture
- Offers DSO for very little money
- Mirrors are not top-notch quality
- Slightly uncomfortable for taller people
APERTURE
102mm
FOCAL LENGTH
600mm
MOTORIZED
No
Mount type
Alt-Azimuth
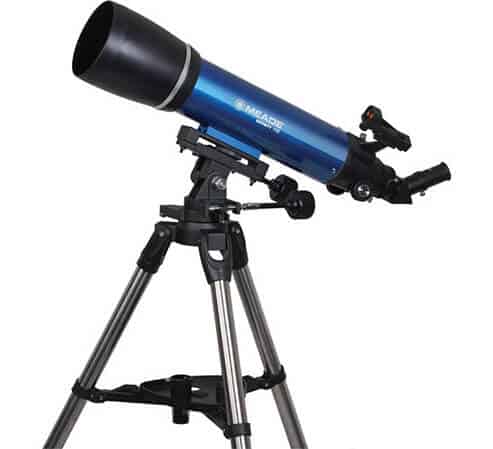
Our thoughts:
The Meade Instruments Infinity 102mm AZ Refractor Telescope is a very solid and very affordable cover-all solution for beginners and amateurs. You can set up the telescope without hassle and because it comes with a tripod, you don’t have to worry about getting an expensive stand.
The 102mm of aperture offer plenty of power and the f/5.9 is a nice middle-ground for exploring all the different pieces of the night sky. The best part is that the telescope comes with 3 different lenses and a Barlow, so you essentially get 6 different magnification settings.
Regardless of what you want to observe, Moon, planets, or land, this telescope will cover you perfectly. The package also includes a DVD for Windows with a lot of celestial objects to explore.
Now, the Meade is very solid for the price, but it simply doesn’t compare to more expensive models. The lenses are not perfectly clear, the mount is not completely stable and the red dot finder is simply frustrating to use.
This is certainly one of the best telescopes among the low-budget solutions, but don’t expect to impress your astronomy teacher with this one.
For best results, expand your purchase with a lens kit from Celestron.
If you are young and on a budget, take a look at our budget telescopes buying guide.
Specifications:
- Optical Design: Achromatic Refractor
- Aperture: 102mm (4″)
- Focal Length: 600mm
- Focal Ratio: f/5.9
- Comes with an included mount
- Beginner friendly
- Different lenses to get you started
- Requires modification or expanding your gear for best results
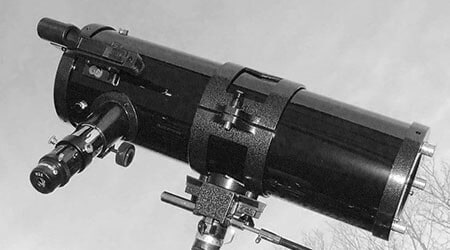
Best Beginner Telescope For Astrophotography
APERTURE
102mm
FOCAL LENGTH
603mm
MOTORIZED
No
Mount type
-
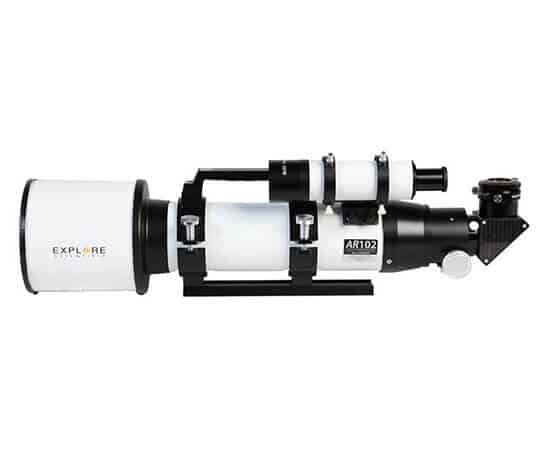
Our thoughts:
The AR102 Aluminum Tube by Explore Scientific is another great refractor that is best suited for astrophotography. It offers some nice design choices like the Removable Dew Shield, the Two-Speed Focuser and Vixen-Style Dovetail.
The telescope is fairly portable and lightweight. The image quality is superb considering the low price. While it is not a superbly high-end telescope and while it suffers from some color distortion, this is nothing that can’t be fixed later in an image editing software.
The carrying handle makes it very easy to move the telescope around if you want to find the perfect position for terrestrial viewing. The Pleiades and the Lagoon nebula look simply phenomenal. We recommend using this scope for some nice long exposure astrophotography.
The telescope is especially great for wide-field viewing, but it lacks enough power for DSO. And a big downside is that it comes without a mount.
Despite the few minor inferiorities, this telescope performs nearly as good as some more expensive models. We recommend it highly if you are going to use it for astrophotography.
To learn more about the complex hobby of astrophotography and how to make things way easier, take a look at our telescope astrophotography guide.
Specifications:
- Aperture: 102mm (4″)
- Focal Length: 663mm
- Focal Ratio: f/6.5
- Limiting Magnitude: 12.5
- Solid and portable travelers scope
- modern features
- great for viewing planets
- Doesn’t come with a mount
FINAL THOUGHTS ON THE BEST BEGINNER TELESCOPE MODELS:
We have shown you a variety of different models of telescopes and we hope that some of the elements and features of different models now seem more familiar to you. While the variety is great, most of the models we introduced you to are middle-ground solutions, so all of them can be used for all the different arts of explorations, albeit in a different way and with varying results.
Our personal favourites are the GoTo hybrid and the Dobsonian as these two offer the biggest ease of use in our opinion, although we can recommend all the models on the list with clear consciousness. That is because everyone has personal preferences and all of these models stand out in their respective price categories.
Are you already convinced by some of the models?
Here are some additional questions that will help you make your final choice!
Buying Guide
Understanding Telescope Types
Different telescopes use different technological solutions to create sharp and magnified images of celestial objects. While there are quite a lot of different methods of achieving these goals, there are three main categories of telescopes.
Here are the different categories:
REFRACTOR TELESCOPES
These telescopes refract light, as their name implies. Refracting telescopes use lens elements. The first lens is located where you view with your eyepieces. The second lens is placed at the top of the tube, which makes it the objective lens.
The rule of thumb is that refractors are more lightweight and economical than other types of telescopes, at least in the lower price ranges.
This makes them into great instruments for day to day viewing of the sky. Another useful feature is that they are good for terrestrial exploration, as well.
REFLECTOR TELESCOPES
This type of telescopes uses mirrors instead of lenses. They are very popular with professionals and in the high budget range, they are the more affordable ones.
There are multiple ways in which the mirrors are utilized. Some use a single mirror, while others use a combination of curved mirrors to reflect light. This is done to form a projected image.
This makes them into great instruments for day to day viewing of the sky. Another useful feature is that they are good for terrestrial exploration, as well.
CATADIOPTRIC TELESCOPES
These optical telescopes combine lenses and mirrors to form an image. Catadioptric models combine both technologies to create an image with a wide field of view with high- quality colors.
Due to their construction, they are also sometimes called compound telescopes.
These hybrid telescopes make use of both lenses and mirrors. This compensates for the weaknesses of each element individually. The few disadvantages of these versatile models include slightly darker images when compared to refractors and slightly more difficult setup.
While this variety seems like a lot to handle at first, especially with a lot of sub-types, it is actually not that difficult to grasp once you get the hang of it. After you learn how to use one type of telescope, learning about other types becomes much easier because many of the basics remain the same.
Understanding Mount Types:
ALTITUDE-AZIMUTH (ALT-AZ) V.S. EQUATORIAL
Besides different types of telescopes, you should also be familiar with two types of mounts that telescopes use. Be aware that some telescopes ship with a mount, while others often come without a mount.
This is important because you need to look out for what you’re buying and because high-quality mounts can be expensive.
To understand the difference between the two main types of mounts, we should first take a look at the function of a mount. The first function is that the mount is a system for controlled movement to point and guide your telescope. The second function is to offer stability for the instrument so that you can view the objects in the sky without any unwanted movement.
The more simple of the two types is the Altitude-Azimuth mount, often called Alt-Az for short. As the name implies, this type of mount has an altitude axis allowing the scope to be moved in an up and down direction. The second axis is the azimuth axis allowing the scope to move from left to right.
The Alt-Az mount is especially good for viewing objects which are close to us, like the Moon or neighboring planets. It is also good for terrestrial viewing. For the exploration of deep sky object and astrophotography, the second type is more suitable.
An equatorial mount is a little bit different. The first axis is called the declination (Dec) axis and is used to move the telescope between the North and South directions. As you may have guessed, the second axis is used to move it in the West and East directions, and this axis is called right ascension (RA) or polar axis.
The polar axis must be parallel to the Earth’s rotational axis for these telescopes to operate properly. What happens is that the polar axis is pointing towards the North celestial pole. The result is a telescope that can easily track any deep-sky object because the movement in the left-right direction happens at the same time as an up and down movement. This makes them unsuitable for terrestrial viewing, though. This type of mount is the definitive choice for astronomical observing and astrophotography because only one motion is needed to track an object’s movement across the sky.
For more details on using these two mounts, check out the following video:
Things to Consider
TIPS AND TRICKS TO START STARGAZING
There are a lot of things to remember when stargazing. Depending on your telescope, you may need to take more or less care of it. Make sure you find the right cloths and cleaning formulas for keeping all of the optical elements clean and make sure to research the proper cleaning methods first.
Going out of town in a rural area is probably the easiest and cheapest way to improve your results. Light pollution has very negative effects on stargazing. Another useful tip is to get up as high as possible, so going for a hike might be a useful idea if you have a telescope that is not too heavy.
The time of the year also impacts your viewing experience. During winter, the skies are clearer and with less humidity in the air. During summer, the skies are hazy and blurry. Also, DSO is best done during a crescent or fully absent Moon, because the reflection of the Moon makes it harder to look out for anything else. Looking at the Moon, however, is best done when the Moon is full, for obvious reasons.
Finally, a viewing tip we have kept for last: try to take a look at the International Space Station. When it is above your position, it is a real spectacle.
GREAT ACCESSORIES YOU SHOULD CONSIDER
There are 4 main telescopes accessories that we think you should necessarily get as soon as possible. These include:
1) A finder scope – if your telescope doesn’t include a finder scope, you should definitely get one as it will make it much easier to find all the things you are looking for. A good finder scope doesn’t have to be very expensive, and while you can definitely survive without one, it makes life so much easier!
2) Additional eyepieces – we suggest investing a nice chunk of money in eyepieces as they will greatly improve your viewing experience. It’s not even about magnification, but about sharpness and color quality of what you will see.
3) Barlow – getting a Barlow will, in essence, double the amount of eyepieces that you own. Again, just like with the eyepieces, we recommend getting a good model even if it is a bit more expensive. Some Barlow models don’t double, but triple the magnification, so you should get one of those, as well.
4) Dew shield – Moisture can appear as dew on the optics of a telescope. This can ruin your star-gazing session very fast, so we recommend getting a dew shield. They also have the added advantage of blocking some of the light coming from your surroundings, so they make images slightly better.
Conclusion
We hope that now you will be able to get a telescope that you will love and cherish for years to come. Of course, upgrading over time and expanding your collection is part of being an astronomer, but are sure that your first telescope will put you on the right track.
Tell us which telescope you are planning to get, or if you already got one, tell us what you would like to buy next!
Have fun with exploring the sky and check out our website for more great content on telescopes, cameras, and binoculars.
SUBSCRIBE TO OUR WEEKLY NEWSLETTER